 Here's a project I did recently to freshen up a secretary desk using some wilderness wallpaper and white paint. If my car battery hadn't died and/or my registration hadn't expired, I would have tried to find an older vintage desk on craigslist to go pick up in the city. But neither of those conditions existed, so I went for this inexpensive, but nice, solid wood option at Target which was delivered right to my door!
 I started by priming the entire surface of the desk, inside and out.
 Then, using a white, latex paint, I painted the entire outside desk surface and the insides surfaces that I chose not to cover in wallpaper.
  I changed out the knobs with some prettier ones from Anthropologie.
  Next, I measured the inside sections of the desk that I wanted to cover and cut wallpaper pieces accordingly. Using an acrylic adhesive [recommend 3M Hi-Strength 90 spray], I covered a section of the desk with the adhesive and pressed the wallpaper flatly onto the section of the desk starting at one end and pressing and smoothing with my hands down and out until the section adhered to the wood completely.
  This was repeated until all sections have been complete. Then, I let it dry.
 One thing to watch out for: When cutting the wallpaper be sure to consider the direction the pattern will be in the desk. It looks best if the design runs in one direction through the entire desk.
 Finally, I sprayed the wallpaper with a protective coating and let it air out for a bit.
 I was so happy to see that a picture of the desk end up on the Editor's Picks page in September's Sunset. I hadn't actually noticed it made the cut (thanks, Dad!) so was quite delighted, because I thought it looked so fun with all the brightly colored desk accessories that we borrowed from Area (thank you, John). And, thank you, Katie!
 Its been such a joy to finally have my bathroom ceiling wallpapered. I'd been wanting to do it for months, but worried with such a project I'd be getting in over my head (get it? a friend recently commented that the punchlines to most of her jokes were "get it?" which probably means they aren't funny - so it is with hesitation that I went ahead with the lame pun...). The Sunset article deadline was just the push, my bathroom ceiling needed. And, the willingness of my meticulous friend, Michael, was just the help I needed.
 We started by rolling on a layer of wallpaper paste. After Michael realized he was much better than me at evenly smoothing the paste onto the ceiling in a non-globbing way, the "we" quickly became "he." It actually is really important to only apply a very thin layer of paste and to do so as evenly as possible, otherwise you spend a lot of time having to smooth it out from the underneath. In egregious cases, too much paste can actually seep through the paper and cause discoloration.
 One strip up, four to go!
 With two strips done, we were really getting in the groove... We started in the middle because we had to work around a vent. Usually, you'd want to start at one edge, I think. Not sure it makes a huge difference, though.
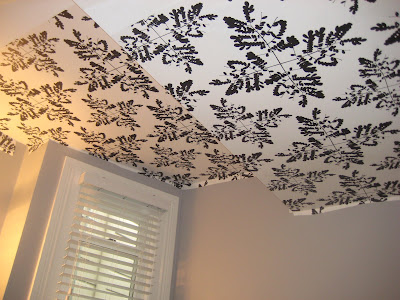 Only two strips left... By this point my role was to hold the wallpaper up so it would fall on Michael's head. Every now and then I helped with the smoothing too, but I'd be stretching the truth to say we'd split the responsibilities evenly or even to say that my contribution to this project wasn't somewhat redundant. But, I still maintain a ceiling project requires two people, if only so you have someone to relive the unique experience with later...
 The final strip, and it's not even lunch time!
 I'd recently learned about a lovely tradition - to sign and date the wall right before the last piece is pasted. I fell in love with the idea of doing this for my wallpapering jobs. I think it appropriately calls attention the pride one should take in the craftsmanship of wallpapering. I also think it would be so intriguing to find someone else's name and date unexpectedly when wallpaper is taken down in the future. I hope more people will start doing this.
 So, we signed and we pasted, and then we let the light shine! I will say that this ceiling wasn't nearly as difficult as we'd anticipated.

 It was definitely worth the effort too, as I've been enjoying my ceiling of little leaves ever since. Thank you so much for all your help, Michael!
 No photos yet, but we wanted to congratulate Trine and Martin on the birth of their baby boy. For those of you who don't know, Trine is the creative force behind fermLIVING and Martin is her equally talented partner. Besides being especially gifted at all things design related (just look at their home!), they are truly a lovely couple. And now, they are a lovely family. We wish you all the very best.
 Hooray, September is almost here! I'm always excited for my favorite month which turns the leaves gold, drops the temperature down to just the perfect degree, inspires the start of something new, and yes, brings the return of good television. But I've been looking forward to this one even more than usual, because September's Sunset is featuring some ferm wallpaper projects!
 They are featured in the "Easy style" section. I can confirm it - the above door panels are extremely easy. You pretty much just need a door, some double stick tape and the desire for an extra touch of style :)
 The stairs = super easy. The tray = easy. Regarding the ceiling, well, I can't lie. Easy might not be 100% accurate. But, in comparison to how difficult I had been imagining it would be, it was easy. So all's well that ends in Sunset! I'll post some before and after pictures of the projects with more step-by-steps in the next few days.
Thank you so much, Jennie and Miranda - that was so much fun!
 Anh-Minh at Apartment Therapy was inspired by Trine's picture above to add some feathers to her work space.
 Using only double-stick tape and a her seriously crafty eye, she put up the Feathers in her new home office. It looks perfect, Anh-Minh! You should give lessons in how to cut and align wallpaper patterns!

 We just got these photos of our Bamboo wall stickers in my friends Ann and Jason's new bathroom. Being creative types (both are graphic designers), they've done a really nice job of establishing a hip, Asian vibe. I'm looking forward to getting over there and seeing it in person!

 Here's a project I did recently to freshen up a secretary desk using some wilderness wallpaper and white paint. If my car battery hadn't died and/or my registration hadn't expired, I would have tried to find an older vintage desk on craigslist to go pick up in the city. But neither of those conditions existed, so I went for this inexpensive, but nice, solid wood option at Target which was delivered right to my door!
 I started by priming the entire surface of the desk, inside and out.
 Then, using a white, latex paint, I painted the entire outside desk surface and the insides surfaces that I chose not to cover in wallpaper.
  I changed out the knobs with some prettier ones from Anthropologie.
  Next, I measured the inside sections of the desk that I wanted to cover and cut wallpaper pieces accordingly. Using an acrylic adhesive [recommend 3M Hi-Strength 90 spray], I covered a section of the desk with the adhesive and pressed the wallpaper flatly onto the section of the desk starting at one end and pressing and smoothing with my hands down and out until the section adhered to the wood completely.
  This was repeated until all sections have been complete. Then, I let it dry.
 One thing to watch out for: When cutting the wallpaper be sure to consider the direction the pattern will be in the desk. It looks best if the design runs in one direction through the entire desk.
 Finally, I sprayed the wallpaper with a protective coating and let it air out for a bit.
 I was so happy to see that a picture of the desk end up on the Editor's Picks page in September's Sunset. I hadn't actually noticed it made the cut (thanks, Dad!) so was quite delighted, because I thought it looked so fun with all the brightly colored desk accessories that we borrowed from Area (thank you, John). And, thank you, Katie!


